If your Word document keeps growing, scrolling to find chapters is frustrating—and page numbers change the moment you edit. This guide shows how to create a table of contents in Word that builds itself from your headings and can be updated in seconds. You’ll learn what Word uses to generate entries, how to insert an automatic table of contents, and how to keep it accurate after edits.
Introduction
Reports, school papers, manuals, and project documentation often start small—and then suddenly you have 15, 30, or 80 pages. At that point, a table of contents stops being “nice to have” and becomes basic navigation. The problem: typing a table of contents by hand is slow, and it breaks the moment a heading moves to a new page.
Microsoft Word can generate a table of contents automatically, but only if the document is structured the way Word expects. That mainly means using built-in heading styles (such as Heading 1 and Heading 2) instead of making headings “look big” with manual formatting.
The steps below work on modern Word versions on Windows and macOS. Menu names may differ slightly, but the logic stays the same: apply heading styles, insert the automatic table, then update it whenever content changes.
Basics: How to create a table of contents in Word (what Word needs)
An automatic table of contents (often shortened to TOC) is a special Word field that collects your document’s headings and lists them with page numbers. Word does not “guess” which lines are headings based on font size. It reads the document structure—primarily heading styles like Heading 1, Heading 2, and so on.
Think of styles as labels. When you apply Heading 1 to a chapter title, you’re not just changing how it looks—you’re telling Word “this is a top-level section.” The TOC then pulls those labeled headings and creates a clickable list (especially helpful in PDFs).
If you want an automatic TOC, format headings with Word’s heading styles—not with manual font tweaks.
In most documents, Heading 1 is used for main chapters, Heading 2 for sub-sections, and Heading 3 for deeper levels. You can include more levels, but keeping it to two or three usually stays readable.
| Option or Variant | Description | Suitable for |
|---|---|---|
| Automatic TOC (built-in) | Word generates entries from heading styles and keeps page numbers updateable. | Most reports, essays, manuals, and PDFs. |
| Custom TOC | You choose levels, tab leaders (dots), and formatting details in a dialog. | Longer documents or specific layout requirements. |
Preparation and Prerequisites
Before inserting the TOC, spend a few minutes preparing the document. This is where most “my TOC is missing headings” problems are prevented.
Check these prerequisites first:
- You are using Word’s heading styles: Select a heading, then go to Home > Styles and apply Heading 1, Heading 2, etc.
- Headings are real paragraphs: A TOC entry is based on paragraph formatting. Avoid creating headings as part of a long paragraph.
- You know where the TOC should go: Most documents place it near the start, after a title page. Create a blank area (a few empty paragraphs or a page break) so the TOC has space.
- Decide how deep you want it: Usually Heading 1–2 is enough. For academic papers, sometimes Heading 3 makes sense.
If your headings already look the way you want, great. If not, you can still use heading styles and adjust their appearance later via Word’s style customization, so the document stays consistent.
Step-by-Step Instruction
Once your headings use styles, inserting the automatic table of contents is straightforward. The key is to insert it as an automatic TOC field so Word can update it later.
- Apply heading styles throughout the document. Click a chapter title, then choose Home > Styles > Heading 1. Do the same for subheadings with Heading 2 (and Heading 3 if needed).
- Place your cursor where the TOC should appear. Many documents put it at the beginning. If you want it on its own page, insert a page break first.
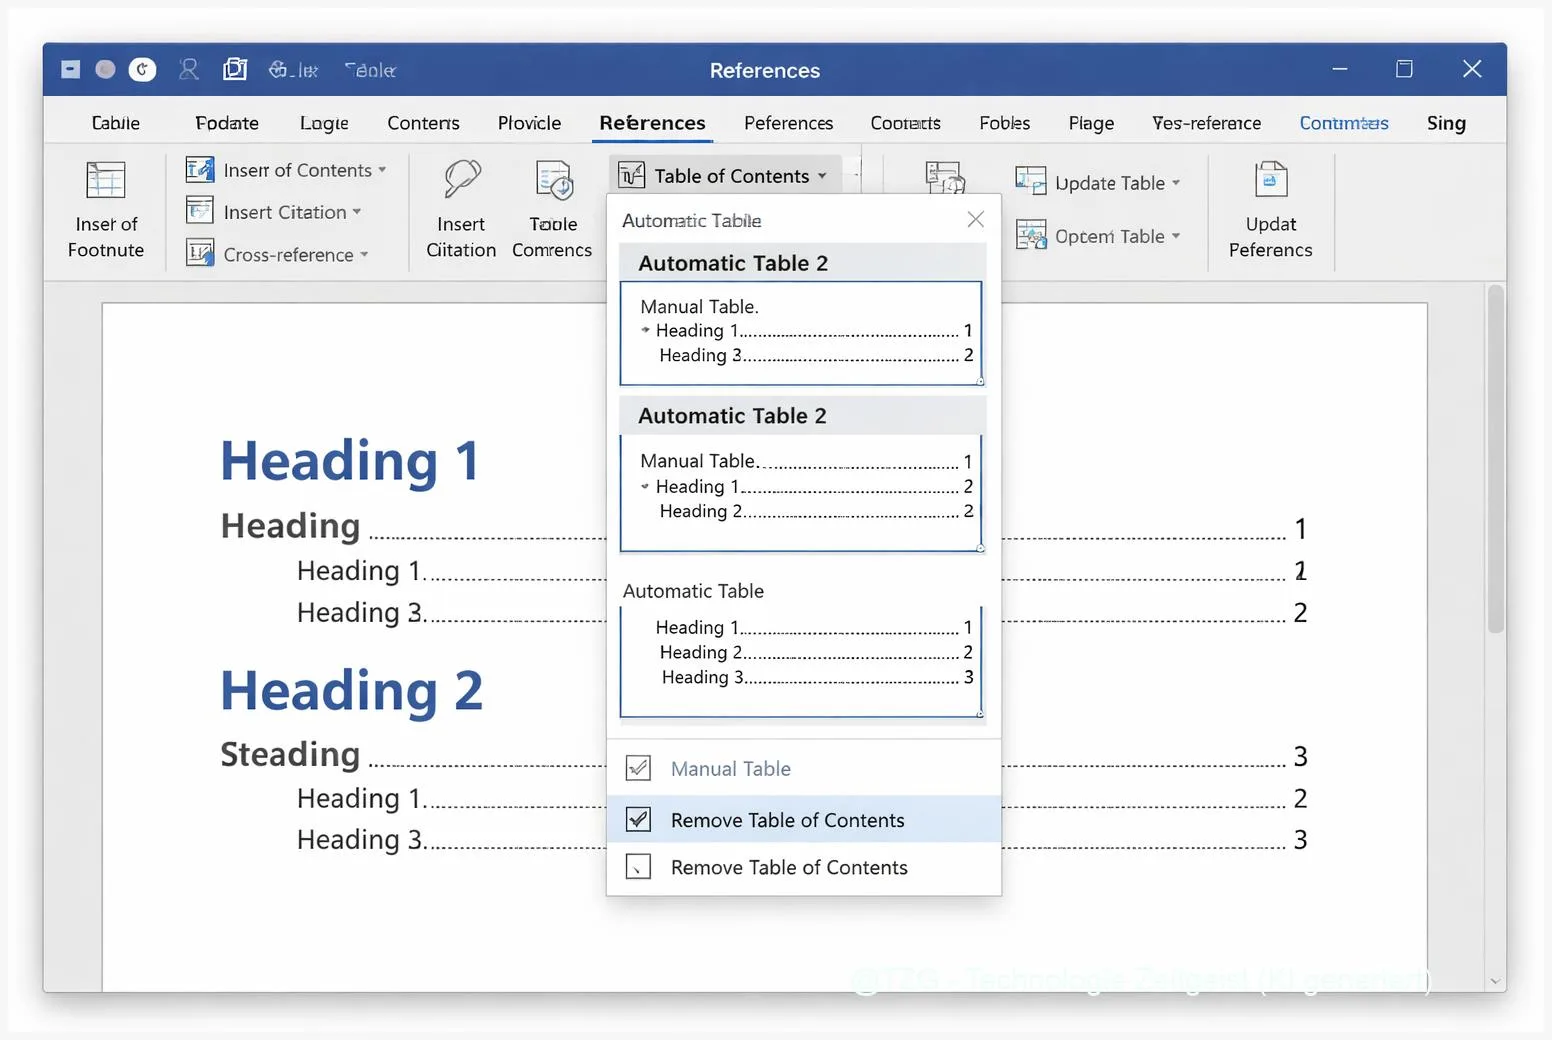
- Open the TOC menu. Go to References > Table of Contents. (On macOS, the tab is also typically named References.)
- Insert an automatic TOC. Choose one of the built-in “Automatic Table” options. Word inserts a formatted TOC with clickable entries.
- Verify the result. You should see your Heading 1 entries immediately. If you included subheadings, Heading 2 entries appear indented under them.
- Update after changes. When you edit the document, click inside the TOC and choose Update Table (or right-click the TOC and select Update Field). Then choose either Update page numbers only or Update entire table.
If everything worked, the TOC entries match your headings exactly, and page numbers reflect the current layout after an update. If a heading is missing, it is almost always because it is not formatted with a heading style.
Tips, Troubleshooting, and Variants
Automatic tables of contents are reliable, but a few common details can trip you up—especially when documents are edited by multiple people or copied from other sources.
Common issues and quick fixes:
- Headings don’t appear in the TOC: Select the “missing” heading and apply a real heading style (Home > Styles > Heading 1/2/3). Then update the TOC with Update entire table.
- Page numbers are wrong: Update the TOC. Word does not always update TOC fields automatically after edits; a manual update is normal.
- Text changed, but TOC still shows old titles: Use Update entire table, not “page numbers only.”
- TOC formatting looks odd: Use References > Table of Contents > Custom Table of Contents to adjust tab leaders (dots), levels, and formatting. For a consistent look, customize the underlying styles rather than formatting each line manually.
- You copied content from the web and styles are messy: Re-apply heading styles to your headings. Pasting can bring in inconsistent formatting that looks like a heading but isn’t one.
Useful variants: If your document needs a very specific structure, a Custom TOC lets you control how many heading levels are included. Also, if you export to PDF, a well-structured TOC improves navigation because headings and entries are easier to click and search.
Practical habit: After major edits, update the TOC right before sharing or printing. It takes a few seconds and prevents the most embarrassing “page numbers don’t match” mistake.
Conclusion
An automatic table of contents in Microsoft Word is less about the TOC button and more about document structure. When you use Heading 1, Heading 2, and related styles consistently, Word can build a clean TOC with correct page numbers—and keep it updateable as the document changes. Insert the TOC from the References tab, then update it when you add sections or move content. Once you get used to working with styles, your documents become easier to edit, easier to navigate, and far less stressful to finish.
Try it on a document you edit often, and share what tripped you up—missing headings, formatting, or updates—so others can learn from it.


Leave a Reply